Making Plugs and Molds
(Photos below.. Do some reading first.)
Most of the examples below were done with a hand layup, and they prove that it can be done, although it's more tedious than vacuum bagging. After you're familiar with the process, be sure and check my Vacuum Bagging Composite Parts page, for some important information.
A note for those who are new to composites...
People have been calling fiberglass a "space age material", since the "space age" began... which is in the 1950s. (!) It was actually invented by Owens-Corning in 1938! So, although we continue to improve materials and methods, the basic science of composites is not new. And remember, it's just a process. Think about all the different skills used to make a typical RC model. There's wood work, adhesives, film covering, mechanical structures and linkages, radio installation, engine installation, and operation of the whole thing. If you scratch build, ther might also be airfoil research, drafting, and a variety of other skills. That's actually pretty complex. Composites are no more complex, just a little different. If you want a good Monokote finish, do it properly. If you want a beautiful composite ship, do it properly too.
This section is about plugs and molds. So... The methods for fiberglassing a finished surface, such as a wing, are so widely covered that I won't discuss all of them here, except to say one thing, which is the primary rule for all fiberglassing. That is, "Excess resin only adds weight, and not strength." The industry standard for proper fiberglassing is to use the same weight of resin as the cloth, a 50/50 mix. So if you have 1 ounce of cloth, use 1 ounce of resin.
What is discussed less often are methods for making good plugs and molds, so you can "kit" your own items. This might be something as simple as a replacement cowling for a kit you already own, or might be as ambitious as actually creating molds for a complete kit. I've tried a variety of popular methods, and will discuss some of the good points and bad points of several methods Included are images of both a typical sport plane fuselage, and also some photos of my first sport prop-jet kit, which shows some of my early mold making experiences. These methods are widely used by people that are essentially doing the work "by hand". Of course, if you have access to CNC machining facilities, then maybe there's a better way. At this time, the article is kind of "spread out", rather than being a clear step-by-step method, because I wanted to discuss "options". Therefore, I recommend reading the whole page before starting. It's a LOT easier to change your mind in advance, rather than having to sand tooling resin to fix a mistake!
Why bother with all this work?
Some people like to fly, others like to design and/or build. If you like both, then you have to know that the biggest reason for doing this is gratification. Flying any aircraft can be fun, but going from a rough idea and a sketch to successfully flying one that you designed and built from scratch is to me, the ultimate satisfaction in RC modeling.
The other reason is repeatability. Let's assume you have an idea for a nice scale aircraft, including lots of scale details such as panel lines, rivet detail, various hatch and door outlines, etc.. You can build a balsa kit, detail it and go no further, if you like. But what if you damage it beyond repair, or sell it? Do you really want to start all over, cutting up pieces of balsa and ply? If you have molds, you can reproduce another fuselage, for example, almost overnight. Of course you'll still have to paint it, but that's not so bad, compared to reconstructing the entire airframe. You might find that a "generic" fuselage of your own design, for example, is useful for trying different airfoils, without building several entire kits. Of course, molds also give you the option of making some of these for other people...Maybe you can make a little money back, to pay for your next project. So, let's talk about the process of making your own molds.
Another benefit of plugs and molds is that they provide longevity. Once you've glassed your plugs, you "win". What I mean is that if something interrupts your project, (like money issues) the glassed plugs will remain stable for years. Unlike plain balsa, they won't warp, decay, or otherwise "go bad". So if you need to put a project aside for a while, it's no problem. Obviously, it's good from a production standpoint too. You don't want your plugs to change shape once you've started to make kits. (!)
Making your own molded fiberglass parts is easy!
Ok, those of you who have done it are waiting for the punch line, so here it is. It is easy to make your own precision aircraft model, with a fiberglass fuselage and sheeted foam wings, etc.. AFTER several months of hard work! The images used on this page are a collection of details from various projects. You may find this information more coherent if you follow along with one particular projects, from start to finish, such a s the 1/6th scale Raytheon Super King Air B200 project, or the J-47 "Eliminator 2" sport jet project. If you'd like to browse some separate composite articles, and come back here later, here are some other examples showing you what to expect:
Large Composite kit | Composite Canopy | Composite Cowling | Composite Wheelpants
I've also added a brief tutorial on how to mold a simple NACA inlet.
In this era of ARFs and other "quick-build" kits, many modelers are reluctant to start this process, because it's too expensive and it takes too long. Well, it's only expensive if you buy everything at once, and it only "takes too long" if you're in a hurry. Buy what you need to start, (you may already have these items in your shop) and plan to take your time. Plan on several months at least. If you finish sooner, great. One thing you must realize about fiberglass techniques, especially in the ending stages, is that it's the art of "make it ugly, make it pretty, make it ugly again, make it pretty again". What I mean by this is that you'll be doing a LOT of sanding and filling, over and over. It's normal, it's all part of the game, and if you haven't done it before, it takes longer than you probably expect. (But again, once you're done, you're really done!)
By the way, here are some handy filling and sanding tips you'll want to keep in mind throughout this whole process. As much as possible, try and maintain a uniform surface color, texture, and chemical composition. Here's why.
COLOR can fool you into doing things you don't want to do, like sanding off something you need. If you have, for example, several colors on a model plug, the color alone can make you think the surface is uneven, and makes it difficult to get the shapes right. A uniform color is easier.
Try not to vary the TEXTURE of your surface too much. On a flying model, you might use a lightweight "spackle" type filler, but on a plug intended to produce molds, you'll want to generally use the tougher ones... Harder to sand, but more durable. Try and NOT vary the chemicals too much, since they make for both an uneven visual presentation (above) and uneven sanding, due to different relative hardnesses.
A good automotive or epoxy primer is the cure for both of the above problems. Sometimes you get to a point where you just cannot tell what is left to be done, until you can see the plug in one uniform color. Then you can better analyze the shape, without color and texture as distractions. A bright light, held at a low angle to your part, will show more imperfections than you probably thought you had.
Finally, know that you must always remove the gloss from any recently-cured fiberglass surface before you can put something else on it. Nothing sticks very well to a cured, unsanded fiberglass finish Even primer must be lightly sanded, before painting. This applies to structural assemblies even more. Never glue anything to fiberglass (like a former in a glass fuselage) without scuffing up the glass first.
Measure Twice, (or Three or Four times!) Cut once.
Before you can make a mold, you have to make a "plug", which is the male part from which you make the female mold. The type I'll discuss is a fairly standard 2-part female mold, from which you make and join two fuselage halves. This is a pretty standard way to make fiberglass fuselages.
Molds are "forever"...
Every inaccuracy, bump, scratch, misalignment, and other error you make in your plug will be present in every part you produce. So understand up front that you will have to take great care in the making of your plug, to save frustration later. Plan on taking longer than you have for previous built-up models.
Before cutting out any parts, think about a few things. First, figure out how many parts (and therefore molds) you will have to make. Mine usually consist of at least 3 assemblies. First, there is the main fuselage itself Then there is the canopy, which is usually removable and requires a separate mold. If you are building a model such as a jet, you may also need an additional hatch further back on the fuselage. Finally, for propeller-driven models, I usually provide for some sort of removable cowling. You'll have to be able to assemble all these parts, during construction, so you can sand them for a perfect fit, but still remove them at the end to make separate molds. Do not waste your time trying to make a one piece assembly and cut out these parts later. It's a very sloppy operation at best, and you'll have to build separate flanges for these things to attach, and probably have a very tough time getting a precision fit. With separate plugs, the flanges for mating are "built-in", and you can be assured of a perfect fit. Your male canopy plug can also be used to produce clear canopies, by the way I won't discuss it here, but you can do this by vacuum forming clear plastic over it, with readily available vacuum forming hobby equipment, or make your own.
Consider the "draft angle" of all your parts. Remember that you have to be able to get these parts out of the mold when you're done, so don't make parts that have an angle greater than 90 degrees. In other words, the widest part of any molding should be right at the mold opening. Give these things some thought, make your drawings carefully, and plan for these separate sub-structures A little advance planning and research can save you a lot of time and money!
Put the knife down, and make some good drawings!
One of the most important things to keep in mind while making your plugs is alignment. At all stages of construction, be sure and maintain some accurate ways of insuring that every edge is exactly square and straight. All parts of your plug must be accurate, or every part you produce from the molds will have the same defect. Make sure the fuselage centerline is absolutely straight, and provide a method to use that line as a reference, to make sure your engine, wings, and tail surfaces will all line up at the appropriate angle later. Think about building your model as a "kit". Provide some marks where the wings and tail surfaces attach, for example, to help the builder get everything straight. This all begins with your drawings, so be accurate. Like an actual model, the most important thing on your drawing is to have at least one absolutely straight line, from which all others can be referenced. I usually make this down the centerline top view of the model, and also the "waterline" (vertical centerline) on the side view. The use of gridded vellum (paper available from architectural suppliers and some art stores) makes this process easier. Trust me, this is a vital step!
Think through your process, and make some sketches and notes before you begin I often sketch, or play around with a CAD program to plan future designs. When you have an idea, put it on paper (or computer file) immediately, so you don't lose the thought. You can always come back later and fix the details. I also keep a few 3-ring binders around, with what I think are the best design and building articles from a variety of sources. Pattern designers are great with alignment. Glider pilots are great with drag reduction. Aerobatic builders are familiar with strong, light structures. Jet builders are familiar with all these and more. You get the idea. Here are some of the items you might consider:
Plan all the major dimensions of your model (length, wing span, tail surface area, etc.) based on sound ideas. Do a little math.
What airfoils will you use? Plan your drawings to accommodate these, and have a method in mind for accurately reproducing them If you plan to cut foam cores, this requires a different process than cutting individual ribs for a built-up structure Include the thickness of the sheeting.
What size and type of engine will you use? Will it use a standard muffler, tuned pipe, or something custom-built? If it's a ducted fan or turbine, then some special installation considerations must be made for the fan unit, ducts, etc. Some engine templates, made from old plans can be useful here.
Where will you place all the internal items? Again, some templates of servos, battery, receiver, and tank would be useful.
Do some planning on weight and balance, using the known weights of the engine, tank, radio gear, etc.. Be sure and include the weight of all wires, tank tubing, pushrods, engine mount, servo mounts, screws, landing gear, wheels, wheel collars, and so on. If this is a scale model, perhaps you want to plan for a scale interior, and come up with ways to hide your RC components.
Will this be a tail dragger, or will it have tricycle gear? Retracts or fixed gear? Floats or skis? You need to know before making drawings.
Think about the "shop" portion of the assembly, and also the "at the field" portion of the assembly. Will the wings and/or tail (or other items) be detachable for transport and/or storage? If so, you need to build accordingly.
Study structures. Do everything you can mentally beforehand to design structures that are strong enough for the expected loads, but also light.
Consider that making a plug for a mold can be a long process. You'll be much happier if you build a durable plug, instead of a delicate one.
Although they won't be in the final model, include some solid structures in your plugs that will allow you to repeatedly mount it on a jig, which can be used to fit parts, and hold it while you're sanding, glassing, priming, etc.. One typical way to do this is to allow the attaching of a jig at the nose and tail of the model, right on the centerline. This lets you rotate the model like a chicken on a rotary grill. If you do this, make sure you make the jig high enough to clear the vertical fin when it's upside down.
So, with all your notes and sketches in hand, sit down and make some very good drawings. Use pencil, so you can make changes. When your drawings are "final", it's a simple matter to have them copied or "blueprinted", for more durability. You'll want multiple copies at the end anyway, so some can be used as patterns to cut parts, others for reference, another set safely put aside. Be as precise as you can, and check everything several times. Another handy tip for both the design and building stages is simply "Walk away". When you get to a problem that is frustrating, put down your tools and do something else. Maybe you just need to stop and think for a few minutes, or maybe you should get some advice, or whatever It's better to stop for a little while, and come back with a solution, than to hurry through that step and possibly make a mistake that will bite you later. I speak from experience!
There are a variety of materials you can make your plugs from. Whatever you choose, you'll be fiberglassing it at the end, and polishing it to a mirror finish, in order to get good clean molds that release the parts easily I've built plugs out of foam, hardwood, and balsa, and have varied results. My material of choice, when doing this by hand, is balsa, with enough harder wood or metal to keep the structure straight and warp-free. It's easy to sand, easy to repair, and easy to fiberglass. Foam is easier during the earliest stages, to get a preliminary shape, but takes a lot more filling and sanding later on than a fiberglassed balsa structure does.
Plan the construction of your plugs and molds to allow joining the seam. For example, if your mold is built in two halves, down the vertical axis of the fuselage, you have to allow access to insert a strip of fiberglass cloth along this seam, when you join the mold halves. It's best to have openings in both ends of the mold, if possible, for this purpose.
Make a Model!
The first part you must make, once your drawings are done, is a "parting board". This is simply a side view cutout, from a sturdy material that won't warp during the time you're building your plugs, such as 1/8" aluminum. (or acrylic, formica, etc.) You can use the part you cut out as the center keel for your plug. Later, you'll need to be able to place your completed plug into this frame, in order to make one mold half at a time.
This also serves to check your work as you build the plug. If the parting board is cut accurately, then the plug should fit perfectly into it at the end. I've found that the material you lose in the kerf, when you cut the parting board (typically 1/32" to 1/16") approximately equals what I add to the surface during the glassing/priming process. Until you develop your own method, you might want to give this some thought before you start on the actual plug, and make a small sample on a scrap of balsa. Do everything to this scrap that you would do to the actual plug, then measure it's thickness.
For each part, including your fuselage, canopy, cowling, etc., you need one of these parting boards. Obviously then, the main one for your fuselage will NOT include the canopy, cowling, etc.. Plan before you cut parts! Put the parting board in a safe place, stored in such a way that it will remain flat. You won't need it for a while! I've used several different past and current projects in the images below, so you can see how some of these ideas are applied to different shapes. If you want to see the entire process for any single model, check the Projects page.
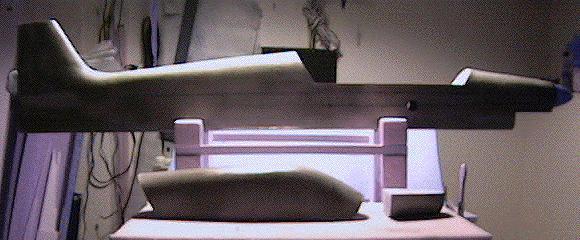
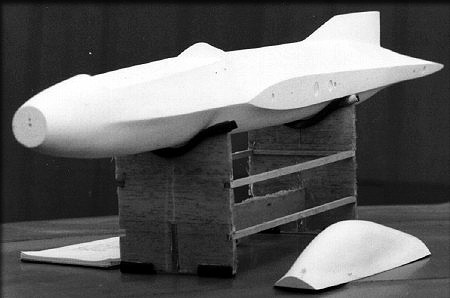
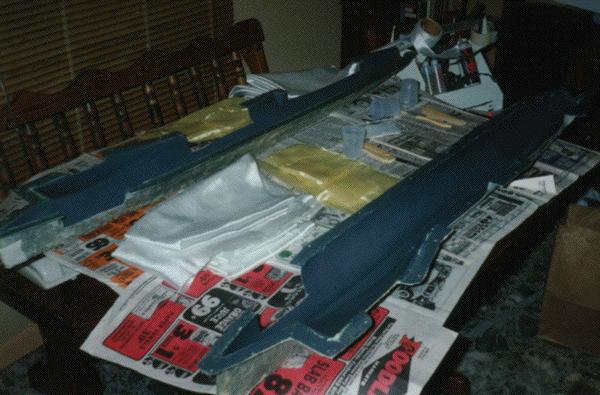
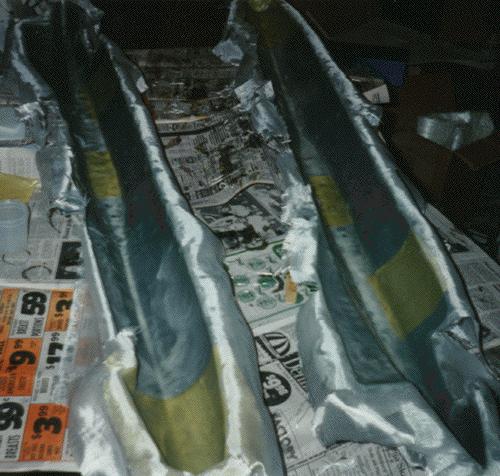
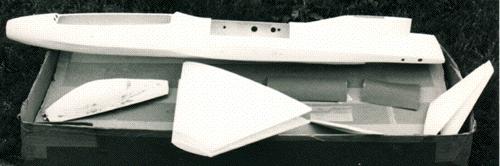
Here are the 3 plugs which compose the fuselage section of of an aerobatic design I built.

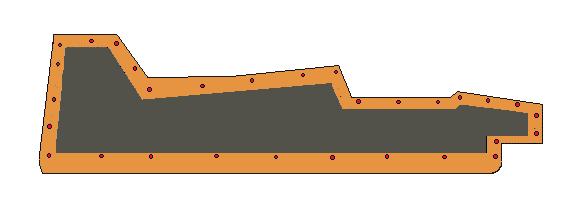
Shown in brownish-orange, here's how your parting board might look. Note that the canopy and cowling pieces are not included. They require their own parting boards. The red "dots" you see around the perimeter are explained a bit further on.
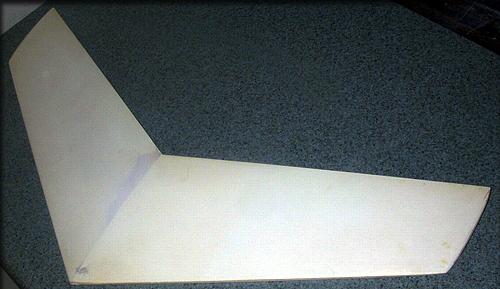
The next thing you must do may seem a little out of order, but you must make a precision set of wings and tail surfaces. (and anything else that attaches to the fuselage) The reason is that you'll need these parts while you're working on your fuselage plug, to make fillets, drill any alignment markings, and so on. Here are the wing, and tail surfaces for the sport jet I made.
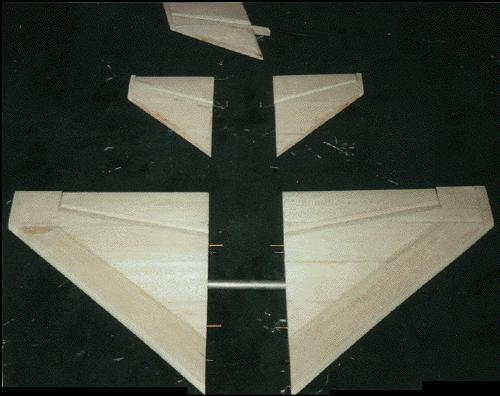
Notice the wing tube sockets and alignment pins are installed in the wings and tail surfaces.
(Wing tube just inserted for the photo...NOT glued in!)
The root ribs were duplicated on the sides of the fuselage plug for precise alignment. (below

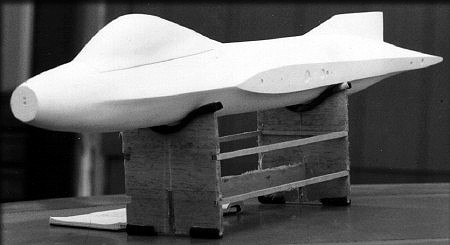
Here's the fuselage plug under way, with the wings and tail surfaces temporarily attached.
With the actual surfaces in hand, you can be sure that everything will fit properly later.
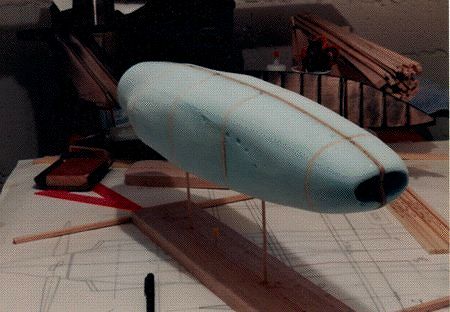
The reddish color of the canopy and nose cone is the result of using phenolic microballoons as a filler/surface coat.
Notice in the photo above that the wings are temporarily attached to the fuselage. They're "plug-in" wings, so the wing tube was actually mounted to the fuselage plug. When you're sure that everything is straight, and you're ready to glass the plug, carefully fill these holes almost completely, leaving a shallow depression (photos below) that you can use later, to know where to drill the hole for the wing tube. This applies to all alignment marks In the fuselage example below, there are molded-in alignment marks for the wing tube, servo wire tube, wing alignment pins, and similar markings for the tail surfaces. These all make the final assembly go a lot smoother, especially for someone unfamiliar with your design.
Here's another way to make a plug Cut a center keel, add some formers, then glue in some oversize foam blocks to fit between the formers. Then simply sand the foam back down to the surface of the formers, and glass it. This is the engine nacelle plug for my 1/6th scale "Avanti" project, before glassing.
Keep in mind that sanding fiberglass is not fun! Do everything you can to make all your plugs as accurate and as smooth as possible before you fiberglass them. When you do finally fiberglass them, do your very best to keep the resin to a minimum, and to keep the surface free of bumps. Then begin using finer and finer sandpaper, wet sanding at the end. Your plugs should have a glossy sheen when complete.
An optional step here, depending on the subject, is to add scale details such as panel lines and rivet details to your plug. There are a variety of ways to simulate rivets, using a small punch etc.. Panel lines can be achieved very easily at this stage, by simply using very fine (1/8 or 1/16 inch) masking tape, then spraying a coat of epoxy primer over it. When the primer is dry, remove the masking tape, and you'll have nice recessed panel lines.
Use a good quality epoxy primer and some rubbing compound to bring your plugs to a completely blemish-free, mirror-like finish. The use of a cloth or foam surface on your work table will help prevent damage to your precious plug. Do not accept anything less than perfection here. The tiny dent or scratch that you don't fix at this stage will appear in every part you make, and be a constant reminder of your impatience. Finally, give each plug 3 coats of wax, buffing in between.
Here are the plugs, showing the canopy attached, for alignment and sanding. Notice the recessed marks on the fuselage side to aid in installing the wings and tail surfaces.
And here they are separately. The "deformity" you may notice at the tail is a result of the scale "twist" built into the fuselage sides of this particular model, emulating the twist on the actual F-16, which gives the tail surfaces their anhedral.
A note about hatches:
The sport jet above had a large center hatch in the top of the fuselage. Rather than make a canopy-like plug for it as a separate piece, (which would've been the better choice, by the way) I tried something different... I made panel lines as mentioned above, outlining the hatch. Then after my main molds were finished, I did a layup right on the fuselage plug itself, slightly larger than the hatch outline, using the same techniques as outlined below for making molds. When I pulled it off, I then had a shallow female "mold", from which I could produce a hatch, which had the same panel lines on it, used as guidelines for cutting it out. To make a flange in the fuselage in which to seat the hatch, I epoxied thin strips of 1/64th inch plywood around the perimeter of the hatch opening, on the inside of the fuselage, and used a Dzus fastener to hold it on It was lightweight and simple.
For comparison, here is the plug for the "Avanti" stabilizer.
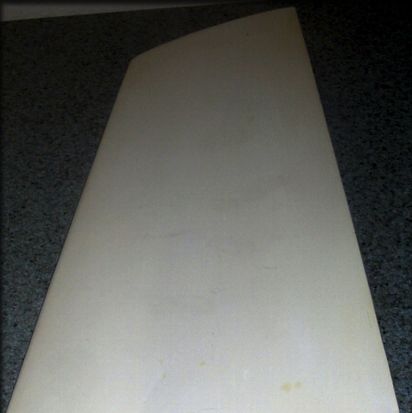
And here's the same stabilizer, a little closer. It's got to be smooth!
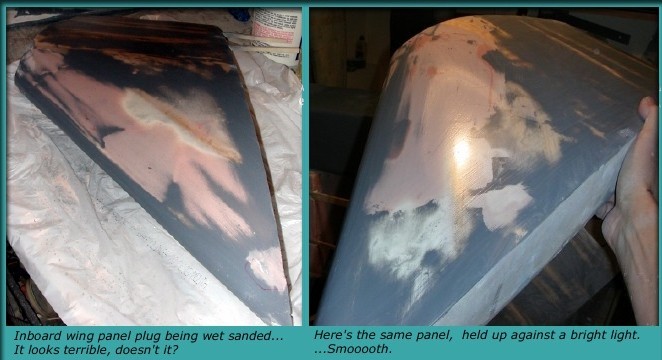
Sometimes a surface can be quite nice, yet look terrible. (Example above)
This wing panel is ready for the final primer coat, although it looks awful.
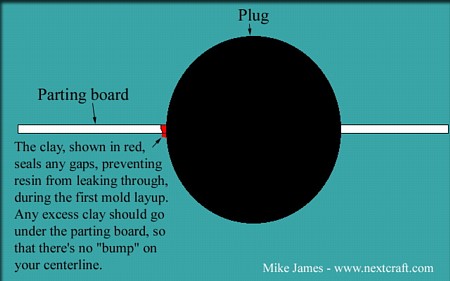
Below is a simple computer image of a more typical sport plane setup, which may make the "parting board" idea more obvious. This assembly should be done so that the parting board is horizontal, level with the work table The view below then, is a top view.
In this top view, the fuselage, shown in gray, has been placed into the parting board, and the edges sealed with clay. The clay must be flush with the board, and have square edges, not rounded fillets. You don't want a rounded "bump" on your fuselage centerline, but a nice straight edge. The clay seal prevents resin from leaking thorough to the other half of your plug, during the next step.
* Alternate Method: |
|
Here's something I wish I had thought of when I made my first molds. Instead of the clay seal above, why not something permanent and rigid? The plug should be waxed and coated with PVA. Allowing for the thickness of the parting board, mask off the half of the plug that will be under the parting board, to protect it from any stray drips, when you use this method. Instead of clay, run a fillet of your favorite hard filler into the gaps between the plug and parting board. This can be epoxy/cabosil, epoxy/microballoons, or a hard polyester filler, such as Bondo automotive filler. Mix it thick enough so that it won't drip, and apply it into all the gaps that clay would normally fill. Using a small artist's spatula or a popsicle stick, flatten it to remove the "fillet". When it's cured, remove the masking material from the plug half that's under the parting board, and remove the plug from the bottom. Now, the parting board and any "fillet" remaining can be sanded flat, leaving a much more precise edge than most of us can achieve with clay... and, it's reusable! Once the parting board is ready, clean, re-wax, and re-PVA the plug, before re-inserting it into the parting board. |
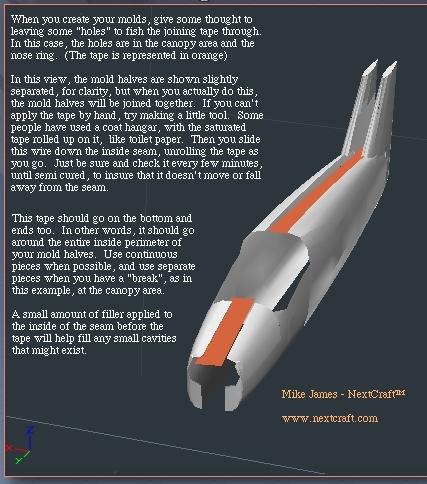
The red pegs are small (approximately 1/4 to 3/8 inch) dowels or other "bumps" on the surface, used as alignment "keys". When you make the first half of the mold, fiberglass over these, which will produce "holes" in the first half of the mold. When you make the other mold half, you'll put resin into these holes, which will create "pegs" in the second mold half. Later, these two halves will "snap" together, keeping precision alignment.
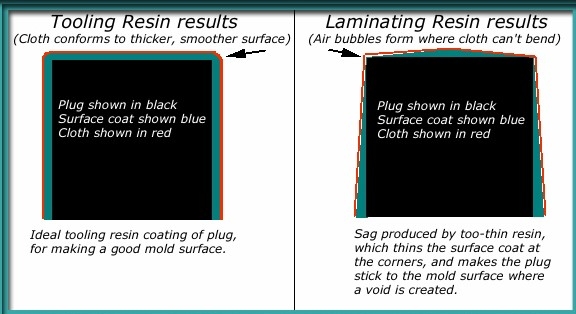
Before you begin the layup, you must carefully wax the entire exposed half of the plug, including the surface of the parting board, and then spray it with a coat of mold release agent, such as PVA. (Poly Vinyl Alcohol) While this is drying, precut all your pieces of cloth, and get all your tools ready. You'll need epoxy, mixing cups, gloves, stir sticks, and other tools of your own choice, such as resin rollers or brushes, to apply the epoxy. You must use a high quality "laminating resin". Attempting to do this with cheap resin is a waste of time, so don't do it. You need very slow curing (12 to 24-hour) resin, to give you a lot of working time. The image below bears out my experience with surface coats. There's nothing like a nice professional tooling resin. The tooling resin coat, applied without any cloth, is very thick, in order to give a uniform thickness, whereas all the following layers (with cloth and/or matt) use an extremely thin laminating resin.
Plan ahead. You'll be applying a layer of gel coat, or resin (often colored black, to make the white cloth show in the mold, later) followed by at least one layer of fairly light cloth, such as 2 oz. or 4 oz. cloth. Each layer must extend onto the parting board at least an inch or two, to form a mold flange. Be sure that the cloth can conform to the shape of your plug. After that, you'll apply many layers of heavier cloth, such as 6 oz. fiberglass, to build up a stiff mold half. I like for mine to be at least 1/2 inch to 3/4 inch thick, so that it'll remain rigid and straight. After the 6 oz. cloth, you can use heavier fiberglass "mat", if you like, just to build up thickness and strength. Remember though, that "mat" has a prickly surface when cured that is rather like handling a cactus. Although more expensive, you might be better off sticking to cloth!
This photo shows the partially completed first resin coat on the plug and parting board. Making the mold surface black (by adding pigment) helps show bubbles and dry areas in the white cloth when you make parts.
Let this cure completely. (at least 24 hours, following the instructions for your particular brand of epoxy. When it's cured. flip the whole assembly over, remove the parting board and clay, but do not disturb your plug. Leave it in the mold half you just created. As before, give the entire exposed surface of your plug and your newly created mold flange several coats of wax, followed by a sprayed coat of PVA Now make the other mold half.
Repeat all the steps you did on the first half, using your newly created mold flange instead of the parting board, and let this all cure. I take the extra precaution of letting this assembly sit for an extra day or two, to insure that everything has cured and that nothing can slip out of alignment. BEFORE you separate the mold halves, drill several holes around the perimeter of the mold, through both halves. These holes will be used later to insert nuts and bolts, to hold the mold halves together when making parts. Finally then, insert some soft plastic wedges (nothing that can scratch your plug or mold halves!) and gently pry the assembly apart and remove your plug. This may take some effort, so go slowly, be patient, and be careful not to damage your work! At this point, you should be thrilled to discover that you have two beautiful mold halves, a plug that you can use to make more molds, if you like, and you're almost ready to make parts. Take great care from now on to protect your plugs and molds from damage.
This is a photo of the molds I made for my "Eliminator" sport jet. (See "Projects" page) Note the openings provided in the mold halves which allow for sealing the center seam later. I've rounded and cleaned up the mold flange edges with a Dremel tool, to make handling easier.
Before you make parts in your new molds, first carefully clean the molds and your plug, to remove any mold release still present, using warm water and a very soft cloth. Check for any damage that might have occurred, (There shouldn't be any.) such as little nicks and dings, and repair them very carefully, using the same gel coat and resin used to make the molds. Finally, give the mold surface several coats of wax, followed by a sprayed coat of PVA.
Remember, we're making parts here from the outside in. So the first thing you put in the mold is your exterior surface. Most people use either a sprayed gel coat, a good epoxy primer, or simply a light coat of resin, followed by the first layer of cloth. (Usually 2 oz. cloth) Add the next layer of cloth, depending on your needs for strength, such as a layer of 4 oz. or 6 oz. cloth. You can also take this opportunity to add optional reinforcements such as Kevlar or carbon fiber, or even internal components, such as formers. if you're careful In the photos here, the gold-colored cloth is Kevlar, which I used on this model to reinforce the engine mount area, wing mount area, and landing gear area.
Here's my first fuselage layup, before the final layer. The runny areas on the sides are the result of a bit too much resin, which was further spread out and absorbed by the final layer Excess cloth was then trimmed. Use a little filler where you have a sharp edge or corner, in case the cloth doesn't fully conform to the shape. You'll have to make slits in the cloth at a few places outside the mold to allow it to conform to sharp corners.
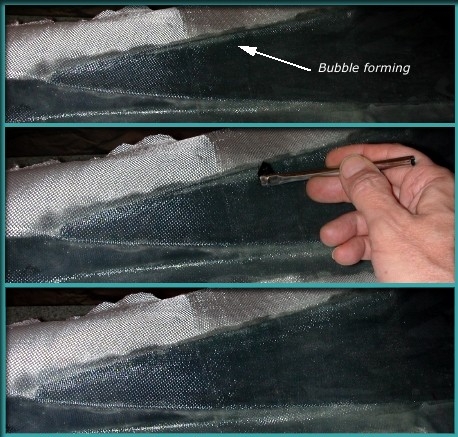
Here's a "bubble" (void) forming at a sharp edge in one of my molds.
I used an inexpensive acid brush to slowly burnish down the cloth and remove the bubble.
Keep an eye on these, as they may re-form when you're not looking!
Lay in your cloth and resin, being sure to remove any air bubbles, and assuring that the cloth is up against the mold surface at all points. Since you're wearing gloves, (right?!) you can use your fingers or an acid brush, as in the image above, to press the cloth into corners, etc.. Before joining the mold halves, wait until the resin has set up enough to become a rubbery, non liquid, and very carefully trim the excess cloth right to the perimeter of your molds, with a very sharp tool, such as a new X-Acto blade, or single-edged razor blade. When this is as neat as you can make it, join the mold halves, and hold it together, using nuts and bolts through the holes you drilled earlier.
Saturate two pieces (or more, depending on your particular mold) of 1 or 2-inch wide fiberglass tape, cut to the length of your mold. Carefully fish it through both the top and bottom parts of the mold, pressing it against the seam to seal it together. A bit of filler will help fill any voids caused by inaccurate trimming of the cloth at the mold edges. Keep an eye on this tape for a while, to make sure it doesn't shift, until it's set up enough to hold on it's own. Leave this alone now until it's completely cured. If you try and pull the parts before they're cured, you'll damage or deform them. It doesn't do any harm to let the parts remain in the mold an extra day, but it's very bad to try and pull them out early. Be patient!
In the image below, the mold flanges are omitted, for clarity.
Don't try to make two parts and join them outside the mold!
This could cause distortion and/or misalignment of the parts.
Do it inside the mold, before the parts are cured.
Use the same care you used when separating your molds for the first time, and gently lift out your new fuselage. If it's stubborn, try a little warm water to loosen it up a bit, but don't pull hard. Once your molds have been waxed and used several times, it gets a lot easier to remove the parts.

This is the first fiberglass fuselage and canopy I made, for my sport jet kit. The "cloudy' surface is a result of unnecessary filler I mixed with the epoxy, but the parts were smooth, and structurally good.
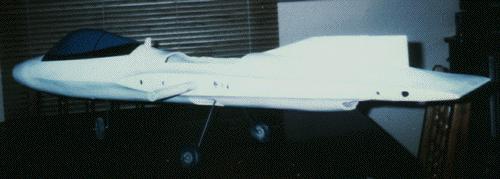
Here's the fuselage a couple of days later, in primer, and with canopy painted. I had also installed the wing tube, some formers, and the landing gear. The "Antenna" just aft of the cockpit is really a disguised handle for the (BVM) canopy latch pin.
When you're finished, you may suddenly realize you're a manufacturer! Here's my first "kit". Like many manufacturers, I began to use a white "gel coat" (epoxy primer) finish on the parts. It makes the parts look better, and also provides a white base coat for painting.
I hope this little example helps take some of the mystery out of the plug and mold making process, for those of you who haven't done it before Once you've done it, you may get hooked It's a lot of work to get this far, but then making parts is relatively easy from then on.
Have fun, and good luck! - Mike James