Buy the very best tools you can. You'll never regret it.
Money is the answer to a lot of problems. Taking the idea to the extreme...
Wouldn't it be nice to simply conceive an idea, and have a staff around to do the research, the CAD models, the drawings, and make the project, precisely the way we want it? We could all have plugs and molds CNC machined out of stainless steel, and have aircraft made entirely of vacuum-molded carbon fiber, and outfitted with the best radio and propulsion. It would of course, have a live audio/video downlink to a display and recorder, and would give us actual physical feedback on our transmitter sticks, in addition to precise statistical records of it's performance. We would immediately know what to change, and then would just make another one.
And now, back to reality...
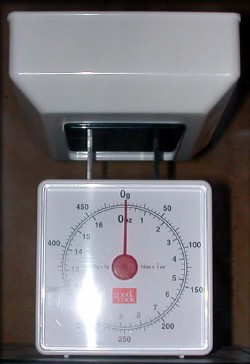
As I said, buy the best tools you can. BUT, don't let the lack of those tools be an excuse for not starting a project, or for sloppy workmanship. For example, we can all use a scale, to help us predict where to put equipment in our planes. If you can buy the $500 super-mega-digital scale, fine. It's certainly not "bad". But, you can also buy a $20 (or less) scale at your local supermarket, that will probably be just as adequate for most of your modeling needs. For example, will it really make a difference in your planning to know that your servo weighs 2.0071 ounces, (on the expensive scale) compared to "about 2 ounces". (on the inexpensive scale) Possibly, but probably not.
Some items you need to build precision aircraft models
You must have a flat building surface, rigid enough to support what you are building without deforming. Next, you'll find it helpful to make it level. in every direction. I consider this to be the single most important item in my shop. All the fancy tools and accessories mean nothing if you can't build it straight. I use a piece of 1/2" tempered glass, 8 feet long and 4 feet wide as my primary surface. It won't warp with weather changes, and because it's so heavy, will not lose it's alignment, once set. Metal would be even better, since you don't have to worry about breaking it. Note that tempered glass, if broken, will shatter into a million small pieces. Having had this happen, I now prefer non-tempered glass!
Even if you choose to use a balsa building board, for example, it's imperative that it be flat, and the big surface underneath that you know is flat helps insure this. Another advantage of glass is that virtually any type of glue or chemical you spill on it can be easily scraped off with no damage to the surface. This piece of glass is very expensive. I obtained mine by calling local glass suppliers, asking if they had "scraps", and stumbled across a dealer who gave me this beautiful surface, (It was framed as a glass door) because a client had bought new doors, and he had no use for this one. Luck comes to those who are looking! (PS> Be VERY careful if you use glass. Obviously, if you drop something heavy on it, it can represent a serious safety hazard!)
Alignment devices:
Become a scavenger! You might do the same type of "scavenging" at machine shops in your area. You'll find that these guys who do CNC work, milling, etc., often throw away pieces of metal that can be treasures for us as modelers. For example, I've been able to obtain several pieces of "junk" metal, previously used as jigs in a machine shop, that are perfectly flat and square. A plastic drafting triangle is good, but a piece of machined steel is forever! They're durable, and also can be used as weights to hold things in alignment, as needs arise.
Wood, Foam, Fiberglass cloth, Accessories:
Become a pack rat! (Easy for me...I'm single.) When you build something, carefully keep what you don't use. If you've been modeling for a while, you can simply use some old kit boxes to keep leftover items. But don't just throw them carelessly in a box. You'll have to eventually sort it all out anyway, so do it at the start. Keep types of wood separate, keep uncontaminated scraps of fiberglass and other cloth in a dust-free box, and keep all those pushrods, landing gear, plastic covering scraps, etc. somewhere else. You might be amazed what you can build at some point, from these "scraps". Keep plans too, as these can be a helpful reference later.
If you're not adverse to driving around your town a little, go looking for the trash bins near construction sites. Often you'll find huge pieces of foam that were thrown away, that are plenty large enough to make a set of wings, or whatever. Cake icing comes in plastic containers with lids, that can be used for storing small parts, or for mixing epoxy. Hershey's chocolate syrup comes in metal cans with plastic lids, good for storing small items. (Get the picture here? Eating cake & ice cream, with chocolate syrup on it is good for your modeling!)
Scrap cardboard is great for making patterns to test-fit parts into your model. You might also find plywood, plexiglass, and other bits of materials that, although they might be too heavy for model use, can be used to make shelves and boxes in your shop.... FREE!
Buy a LOT of sandpaper.(and various fillers) The secret to a great doped finish is sandpaper. The secret to a great Monokote finish is sandpaper. The secret to both a great polyester resin and great epoxyglass surface is...you guessed it, sandpaper.
Drafting Tools - Again, if you can afford the super-mega drafting setup, including a top-notch CAD system, plotter, and laser cutting machine, go for it. In the meantime, a few simple drafting tools will help a lot. Just buy one every once in a while, and accumulate them as you can.
Just so you don't say I never gave you anything...
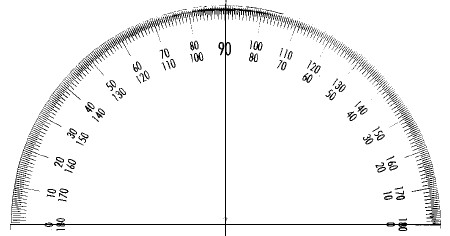
Here's a downloadable protractor image. Make a few copies on your printer, and these can be used around your workbench, with no fear of damaging them. You can even cut them up into just the segments you need, and use pieces of them. If you're a Mac user, check out this great tool.
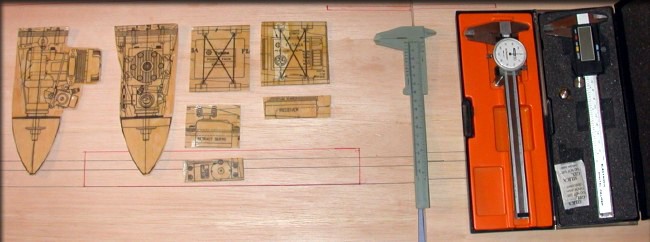
On the right side of the image are 3 different calipers. Calipers can measure inside and outside dimensions, as well as depth into "holes", and the height of "steps" between materials. ...Very handy! The one on the far left is plastic, and cost less than $20. The dial and digital versions on the right were each about $150, but are well worth it. If you take care of them, they'll last forever. The especially nice thing about the digital version is that you can simply push a button to switch between American and Metric standards, and another button sets the counter to "0" any time you press it. That lets you measure the difference between two objects. ...Again, very handy!
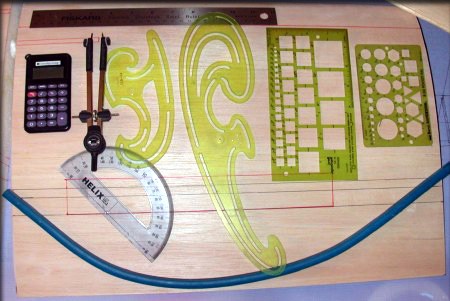
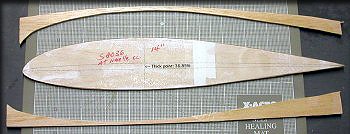
In the image above, you can see I've created some templates of commonly-used items for one of my projects. You can measure the items and make your own drawings, or cut pieces of kit plans out. I've done that, and after checking to see that they were accurate, epoxied them onto 1/8" balsa or plywood, glassed on both sides. (to make them last longer)
A simple method for making and preserving templates for drawings
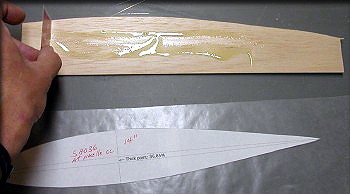
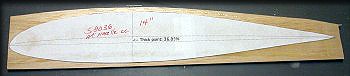
If you are going to cut foam cores with a hot wire, make proper templates from something that can take it, such as formica. However, if you need to preserve patterns for other reasons, such as tracing templates to be used in drawings, there's a quick and easy way to do it.
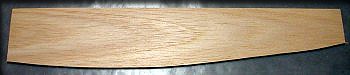
Balsa (or any wood, for that matter) will eventually warp over time, due to moisture and temperature changes. Here's the method I use for preserving tracing templates made of simple 1/8" balsa. It takes about 30 minutes from start to finish. The example here is a rib pattern that I use fairly often, so the first step was to plot the rib pattern onto paper, and draw a centerline marking on it.
|
|
This same method can of course be used for any templates, such as side, top, and front views of engines, firewall patterns, servo views, and many other items. These are handy for drawing your own plans, especially if you tend to use similar radio gear, engines, and airfoils on your designs. |
|
|
|
|
|
|
|
|
|


Tools don't have to be expensive. Make your own!
One of the first things you can do, once you know you have a flat surface, is use it to make some of your own tools. The information below will help you create some tools from scratch, that are just as accurate, for most purposes, but cost you only pennies. Some can even be made from scraps!
"Angle iron" or "Angle aluminum"
It's 90-degree angles can be used to insure that parts are vertical, relative to your work bench.
It makes a great sanding tool for long surfaces such as wing panels.
"Angle iron" is heavy, and can be used to hold parts down while epoxy or other adhesives cure.
Depending on the quality of these, they can be used to insure that edges are flat and/or straight.
If the metal is relatively smooth, it can be used as a jig or as a mold, to build or mold similar "angle stock" out of wood or fiberglass.
Scrap (shelf-size) pieces of glass
Once cured, adhesives and resins can be easily scraped off glass, so this makes it a great surface to build small assemblies on, insuring they're flat. You can easily pick up and move whatever is on it without disturbing it's alignment.
Need some fiberglass laminate "pre-made"? First, clean each piece of glass and give each piece a coat of PVA. Then, spread one or more layers of cloth and resin on one piece of glass, (with or without another material, such as balsa) and then place another piece of glass on top of it, PVA side down. When cured, both surfaces will be smooth and flat. It can then be used as wing skins, scale "metal" panels, spar caps, or a variety of other uses. Place some weights on the glass during curing to insure that excess resin gets squeezed out.
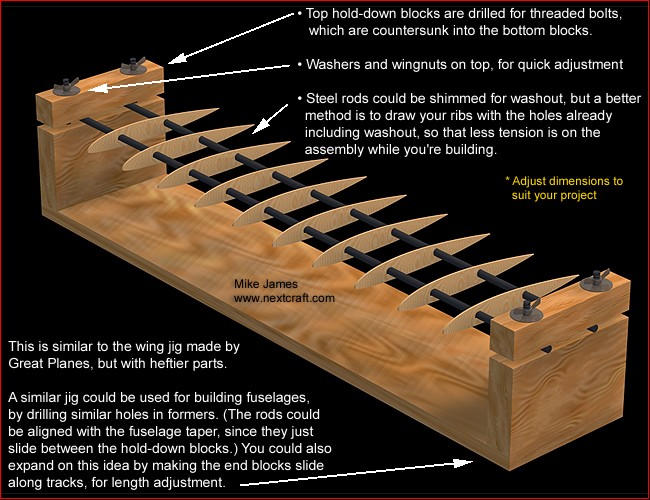
Fixtures and Jigs to hold sub-assemblies
During the building of a model, it would be handy to be able to move an entire sub-assembly, such as a fuselage or wing, to another part of your shop, without disturbing it's alignment. My solution is to build simple fixtures to hold each of these, using some short pieces of tubing and a small piece of counter top material.
You can make your own "sockets" for whatever size tubing you use, for just pennies. Simply give a piece of tubing a coat of PVA. While it's drying, cut scrap fiberglass cloth into approximately 1-inch wide strips. Wearing gloves, and using waxed paper on your work surface, wrap the saturated cloth around the tube, like a barber pole. Build up at least two layers, and using your gloved hands, smooth it out, both for neatness, and to remove excess resin. When this is cured, twist these sockets off the tubes. These can be really stubborn, and you may find the use of some cold water running through the tubes to help contract it a bit may help. Some people take the extra step of wrapping some plastic wrap, or even Monokote around the tube before spraying it with PVA, to aid in releasing the sockets. I make all of mine this way.
The following method is a too heavy to use for flying parts, due to the sockets epoxied into the structure, but it works great for supporting plugs used in the construction of molds. These (often large) structures must not only be built straight, like any other model, but often must be held in alignment for several months at a time, while the plugs are shaped, glassed, primed, etc..
Simply size the counter top scrap and tube spacing to meet your needs. Remember not to drill all the way through, so that nothing will slip when you move the assembly. If you take the time to build a simple jig like this, it can be used over and over for many models. (The tubes simply unplug from the sockets.)
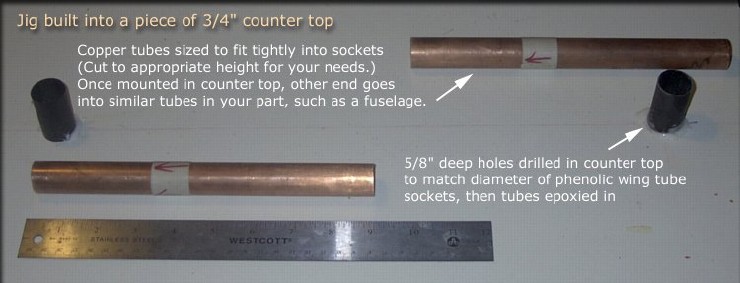
The Jig Components
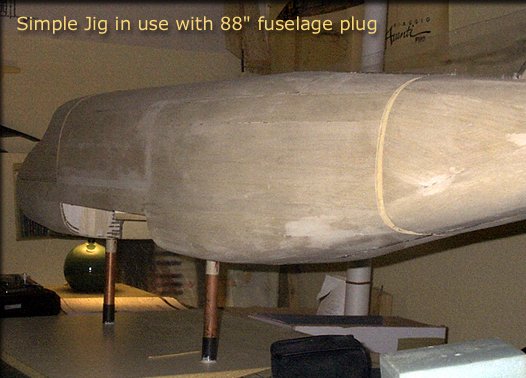
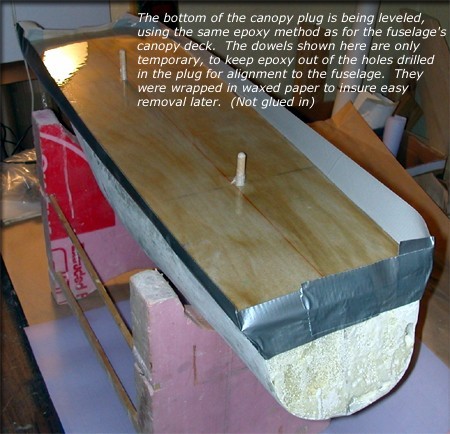
The jig in use, holding a large fuselage.
During final finishing of the plugs, the holes in the bottom are plugged and sanded flush.
The advantage of the fixture above is obvious. But there will be times when you'll want to turn the part on it's side, or upside down. One solution is to build a rotating jig, which allows the part to be turned on it's axis, like a chicken on a grill. If that isn't practical, for one reason or another, you can simply make a cradle from foam. It's inexpensive, sturdy, and if you like, disposable. The pieces can be cut from foam with a knife or hot wire, then easily sanded to the shape required. Some simple braces can be epoxied to the foam, providing plenty of rigidity for this kind of stand. ...Very simple.
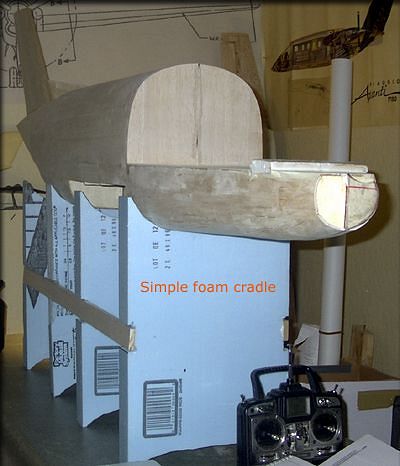
The foam cradle in use.
Tip..Make it tall enough to clear the vertical fin, when it's upside down.
Height Gauges and Scribes
Let's say you have a 2-inch thick piece of foam that you intend to use to make wing cores from. To insure precision, it would be wise to mark a centerline around the perimeter of the foam. Using a ruler, and drawing lines is one method, but can introduce errors if the ruler slips, or if the marker you use has a thick or ragged tip. Since you know your table is flat, we can do this task a lot faster, and with a lot more precision, using a simple homemade height gauge.
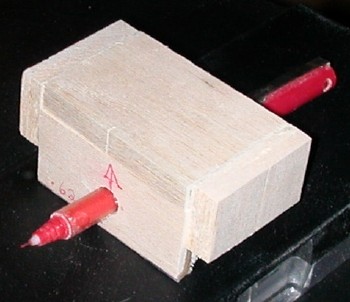
Here's one (below) which doubles as a scribe. Simply glue some scrap blocks of hardwood together, and after insuring that it's the right height, glue the cut off tip of a pin to the gauge. To use it, simply slide the gauge on your work surface, going all the way around your foam, scribing a nice thin line at a uniform height.

The 1-inch height gauge/scribe
Another use for a similar jig might be to make a line on a fuselage, for wing alignment, or perhaps to show where a window or other scale detail might go. If you know your fuselage is aligned, relative to your work surface, You could make a taller height gauge, like the one above, for that purpose.
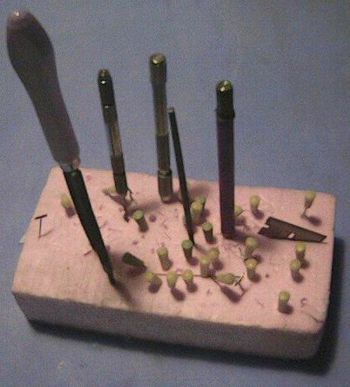
Simple and practical - Something to hold pointy tools on your workbench (Cost: 25 cents)
And here's the super deluxe version. (Cost: 35 cents)
The cheapest tool around is gravity.
You can use a plumb bob (or any hunk of metal you have laying around) on a string hanging from the ceiling, to determine a perfect vertical line. (...and if you have a cat, they will enjoy playing with it.) If you know your work surface is level, and you can hang a piece of metal on a string, then you have two precision 90-degree angles. Simple!
Using gravity to "auto-level" a layer of epoxy can create a perfectly flat surface on a plug, for example.