Foam Wings and other parts
Like most other composites, the use of foam in models has a specific purpose. In a composite structure, the foam serves the purpose of providing a shape, while the material that surrounds it serves the purpose of providing the strength. Foam on it's own is not structural. Foam has some qualities you need to be aware of, as far as how it reacts with adhesives and solvents.
Styrofoam (extruded or expanded bead polystyrene) can accept epoxy, and certain other types of mild "white glues", with epoxy being the best choice. Almost any other type of glue, solvent, and paint will melt stryrofoam, and obviously should not be used. CA and polyester resin will also melt styrofoam, and should not be used. That's why, in addition to the structural strength it adds, foam wings and fuselages are always sheeted and/or fiberglassed, before any finishing work can be done. It has the advantage of being very easy to sand and shape, cuts easily with a hot wire, and, in the lower densities ("white" and "blue") is fairly light. Don't use the heavier ("pink") foam for flying model parts, in general, although it's good for making plugs.
Urethane foam is also fairly light, easy to sand and cut, and has the advantage of resisting most glues and solvents. It should NOT be cut with a hot wire, or otherwise "burned" because it gives off very toxic fumes that are a serious hazard. Having said that, it has it's place in modeling, especially in the case of making plugs for molds. It is also easily fiberglassed, using either polyester resin or epoxy. I've actually poured the two-part expandable urethane foam between bulkheads on a keel structure, let it expand, then sanded it back down to the bulkheads, making a rough shape for a plug very quickly. (See the How To Make Plugs For Molds...Differently page.)
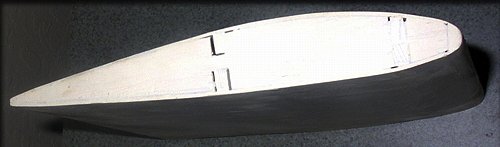
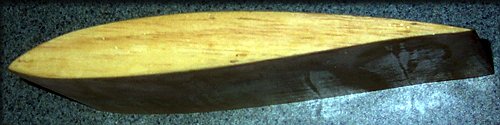
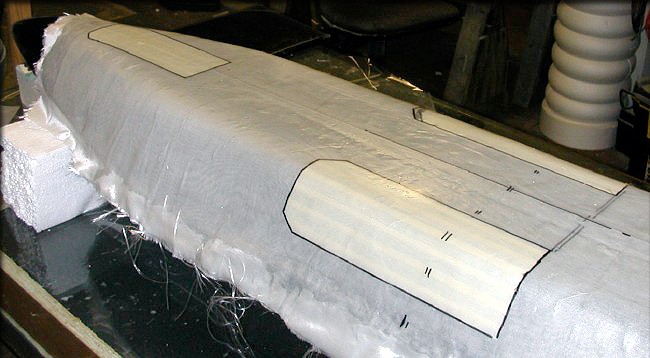
One advantage of making foam wings is that it's easy to be both fast and precise. Take a look at the two images below, which were tests for me, when I began building plugs for the "Avanti", and you'll see why I prefer foam at times.
This was made in the traditional way, plotting individual ribs, inserting spars, and finally sheeting the structure. I didn't do a very good job of getting the shape right, (got impatient, because it was "just a test") and correcting all those ribs would've been a very long process, and fairly expensive too.
In one afternoon, I cut foam wing cores, assembled the sheeting, and had this shape, which is a lot more precise, and less expensive. A wood structure as precise could have been built, but the time factor was not something I was not happy about, so I went with foam.
Making Foam Wing Cores is relatively easy, using styrofoam. There are several commercial devices made for cutting foam wing cores and other parts. The basic process is to produce templates first, (usually a "root" and "tip" template) then use the electrically-heated hot wire to cut the basic wing shape out of the foam. Next, any interior cutouts and/or installations are done in the foam, before it is sheeted and/or fiberglassed. This can be accomplished with physical pressure on the sheeting/foam/sheeting "sandwich", or by vacuum bagging, which is the superior method. If properly done, the resulting structure is both strong and light, and has the advantage of being relatively fast, compared to cutting, shaping, and assembling a lot of balsa.
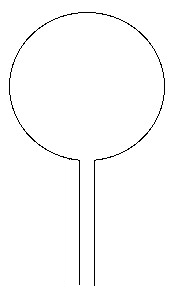
Sometimes you'll have a need to cut a channel, or other hole in your core, span-wise. This could be used for installing a wing socket for a joiner tube, or simply a channel to route servo wires through. One neat way to do this is to make a small custom tool, for use with your foam cutter's power supply, or by inserting the tool into a soldering gun. Here's what this simple wire tool would look like. (Use the appropriate type of wire for your power requirements, and use caution.)
Here's a tip for foam wings you may not have thought of...

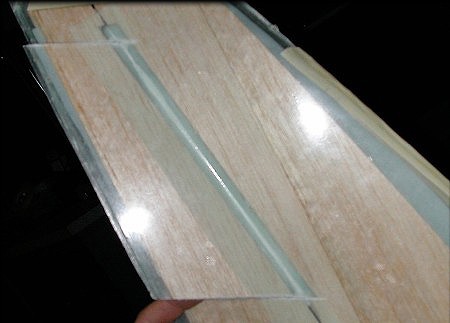
Here's an image you've seen many times, showing the profile of a foam wing and aileron.
Foam does not provide a good material for hinging, so when you cut control surfaces for a foam core, you must face the trailing edge of the foam core, and the leading edge of the control surface with balsa. This adds rigidity, and provides a material for gluing the hinges in.
You could cut the control surface out, then remove some leading edge material and replace it with balsa. Then you would remove some trailing edge material from the foam core, and replace it with balsa. Finally, you would probably tack glue the surface back onto the wing, and sand to the proper shape. Tedious.
A better way is to "build them in"...
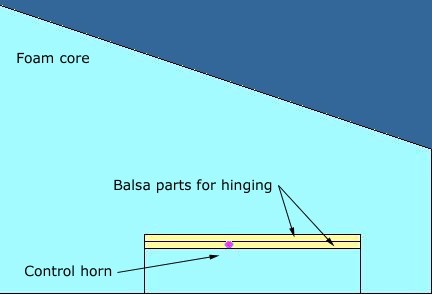
In the image above, foam is blue, (sheeting omitted for clarity) and balsa is brown. After sheeting the wing, simply draw the control surface, including the leading and trailing edges mentioned above, onto your balsa sheeting, on both sides of the wing. Then carefully cut out only the area occupied by the leading and trailing edges, leaving the control surface in place. Now, cut the two required pieces of balsa. Apply epoxy to the exposed foam surfaces in the wing only, (You don't want to glue the two pieces of balsa to each other!) and insert them into the slot you've made. Wipe off any excess epoxy and let it cure, then sand the surface smooth. The purple "dot' in the image is another item you may want to add, which is a hardwood dowel, epoxied into the leading edge of the control surface, which will serve as a mounting for a control horn. Sand it flush with the surface. A strong and simple control horn can be made by threading a nylon aileron connector onto a 6-32 machine screw, then screwing it into the dowel.
When the epoxy is cured and the wing is sanded to shape, you now have "built-in" control surfaces! Later, when you cut them out, they will fit perfectly! All that remains is to face the tips of the control surface with some 1/16th balsa, and do the same for the exposed foam in the aileron cutout. Then bevel the leading edges of your control surface as required, and you're done. Very slick, and much easier to maintain precise fit and alignment.
Composite Skin Hinges
You may have seen composite hinges on high performance gliders, and on kits by companies like Composite-ARF. The are extremely clean looking, durable, and they work great. Here's how they're done, in a vacuum bagged layup.
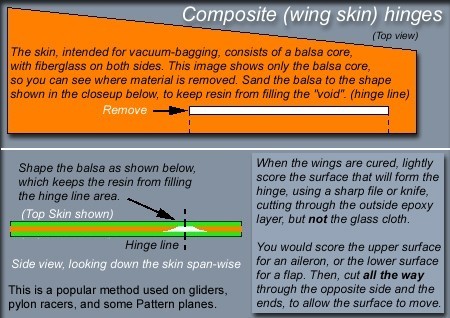
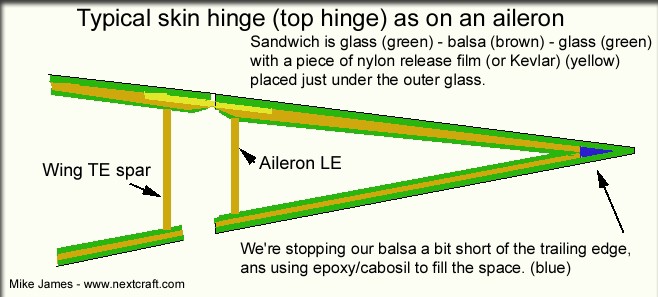
Here's a closeup view of the layup used to create the skin hinges.
Tests are invaluable. I never try a new process, such as paint, etc., on a major project. Instead, I make a series of simple and inexpensive tests first, refine the idea, then finally use it on a model. For example, here's how we tested the composite hinging method above...
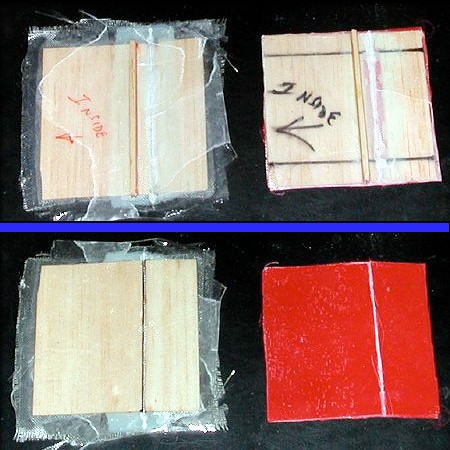
These test parts are approximately 4 inches square. The top pair of images is the inside, and the bottom pair is the outside. I tested two different methods of doing the hinges, on these inexpensive pieces of balsa, to figure out how they worked, first.
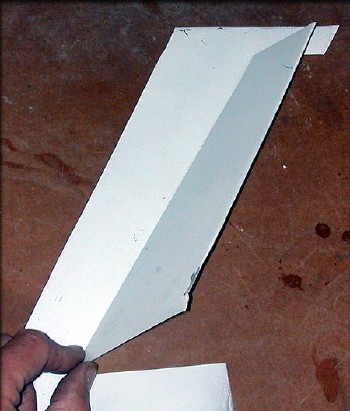
Next, I made a partial layup in a mold for a vertical fin, and tested it there.
Finally, I incorporated it into the "Eliminator 2" vertical fin, and on the other wing and tail parts. By the time I got to this stage, it was no experiment. We already knew how it would work, and wasted less time and material.
Landing gear systems, including gear doors
Rather than experiment on an actual fuselage, we made a simple two-layer layup over the bottom of our fuselage plug, after covering it with plastic wrap, to keep epoxy from sticking to it. Once done, gear doors were roughly outlined, then traced and cleaned up, using gridded vellum. When they were correct, we used our vellum patterns to transfer the patterns onto the actual fuselage plug.
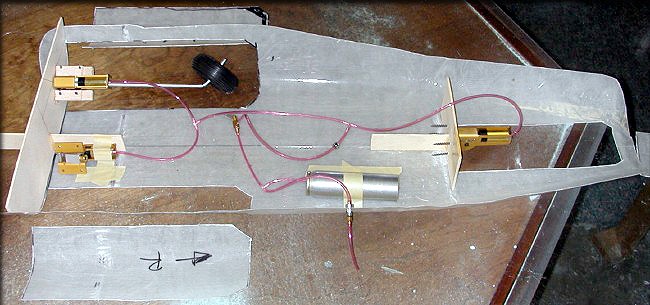
The layup above was trimmed a bit, then some temporary formers were CA'd into it, so we could verify the retract operation. I also cut out the doors, and did some testing to decide how we would hinge them, and how we would operate them. When I install these on the actual model, all the guesswork will be done, and we know they'll work right.
Simple way to join elevator halves in a sheeted foam wing
Alignment of Elevator Halves can be accomplished by creating a "built-in" joiner. Once you've built the horizontal stabilizer, use the method above to create the "built-in" control surfaces. Then cut a slot for the joiner that connects the elevator halves. I use a 1/4 inch carbon fiber tube for most of mine, but you could use a rigid wire, or other material, depending on the size of the elevator assembly. Here's how I do it:
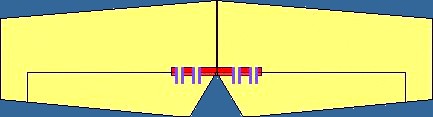
Here, the joiner tube is shown in red.
Cut a slot for the joiner tube, and carefully tack glue it only to the elevator halves. Don't glue it to the stabilizer itself! Later, when you cut the elevator halves free from the stabilizer, secure the tube as follows. First, finish gluing the joiner directly to the stabilizer halves with a little epoxy. Then drill a couple of small (1/8th inch) holes from the front (leading edge) side of the tube, through the tube and into the stabilizer about an inch or more. These are shown in blue, above. Then cut some lengths of yellow nyrod to fit, and epoxy these through the tube and into the elevator halves. (Shown in yellow above) Now you have a light, rigid and vibration resistant connector that will maintain elevator alignment!
Foam Fuselages, Cowlings, and other parts can be made using at least three different methods.
You might shape the part out of foam, cover with with wood and/or fiberglass, and simply leave it! If you are building a foam turtledeck for an airplane, for example, you might elect to hollow out part of the foam or not, depending on your structural needs, and go no further.
If you just want to make one part, and don't care about repeatability, you may choose the "lost mold" method. Basically, you form the part you want out of foam, cover it with fiberglass, being careful to keep it smooth, since the exterior is what you'll see at the end. When you're satisfied, you remove the foam from the inside, using one of two methods. If there's an appropriate opening in the part, you can simply dig out the foam, being careful not to damage your fiberglass shell. Or, if you take proper safety precautions, you can use a solvent, such as gasoline or acetone to melt the foam out of the inside. BE SAFE! You must be aware that these solvents are highly combustible, and that the melting foam produces toxic fumes you must avoid, and that the melted foam itself is rather a nasty mess. So be VERY careful if you use this method
You can also shape parts such as a complete fuselage out of foam, then cover it with wood and/or fiberglass, and go a step further, to produce a finely-finished plug, from which you can then make molds. This gives you repeatability, which makes sense for a complex project. It's what I do with all my original designs.The process is long and tedious, but once you're done, you're really done!